Showing posts with label Chinese new year dishes. Show all posts

Steamed Prawn dumpling / Siew Mai (蒸鲜虾烧卖)

Another impromptu post. :P Impromptu because I did not have the intention to post this recipe but later changed my mind again haha! Mainly because my kids love siew mai / dumplings in general, so I reckon it's best I record this down. ;) Anyway, this is a rather easy dish, so gonna keep it a short post. And if you are looking for simple steam meat and prawn dumpling recipe, then this should be it.
If you are expecting these to taste like those selling outside...well, you can very well change the page now. Store bought ones are usually packed with seasoning and additives to achieve that certain flavor and texture. All natural home made ones will taste slightly more blend but most definitely more healthy! And most certainly suitable for your kids, family and yourself. ;)
So let's take a look at the recipe shall we?

Recipe for Steam Meat & Prawn Dumpling / Siew Mai ((蒸鲜虾烧卖) -makes 8-10
160g minced pork
8-10 large prawns, peeled and devined
8-10 round fresh wanton skin 
1 sprig of spring onion, chopped fine
2cm ginger, peeled and minced finely

Seasoning 
1 tbsp light soy sauce
1/2 tsp ayam powder seasoning
1 tbsp corn flour
1 tsp sesame oil
1/8 tsp five spice powder
1/8 tsp white ground pepper
1/2 tsp sugar
1 tsp Chinese Shaoxing wine
  • On the chopping board, cut off about 1/3 of the prawn (the 1/3 part as the tail portion). Repeat with the rest of the prawns. Then leaving the 1/3 tail part, then roughly chop the 2/3 portions. 
  •  
  • Mix the 2/3 chopped portions of the prawns with the minced pork. Then add in the seasoning and mixed with with your hands, giving it a good squish all over to make sure it is well incorporated. Then lift the minced meat mixture and slam it into the bowl, do this several times so as to improve the texture of the meat...as I was told haha. :P
  • Next add in the minced ginger and chopped spring onion and mix well again. Let the mixture marinate for a good 1hr in the fridge.
  • After 1 hr, prepare 1 small bowl of clean water, the dumpling skins, the reserved prawn tails and the fillings on a clean working surface.
  •  
  • Dap some water around the rim of the dumpling skin.
  •  
  •  Then place the dumpling skin on your thumb and forefinger, which you form a ring. Add about 1 heaping tablespoon of the filling in the middle. 
  •  
  • Then press in the sides of the dumpling skin so that it's rim form a circular ring. Place on the working surface, and slow form the shape to a small cylinder shape. Then stick a prawn tail in the middle.
  •  Repeat the same steps to make more dumpling till you make 8 or 10 of them. You can double the recipe if you want to serve more people.
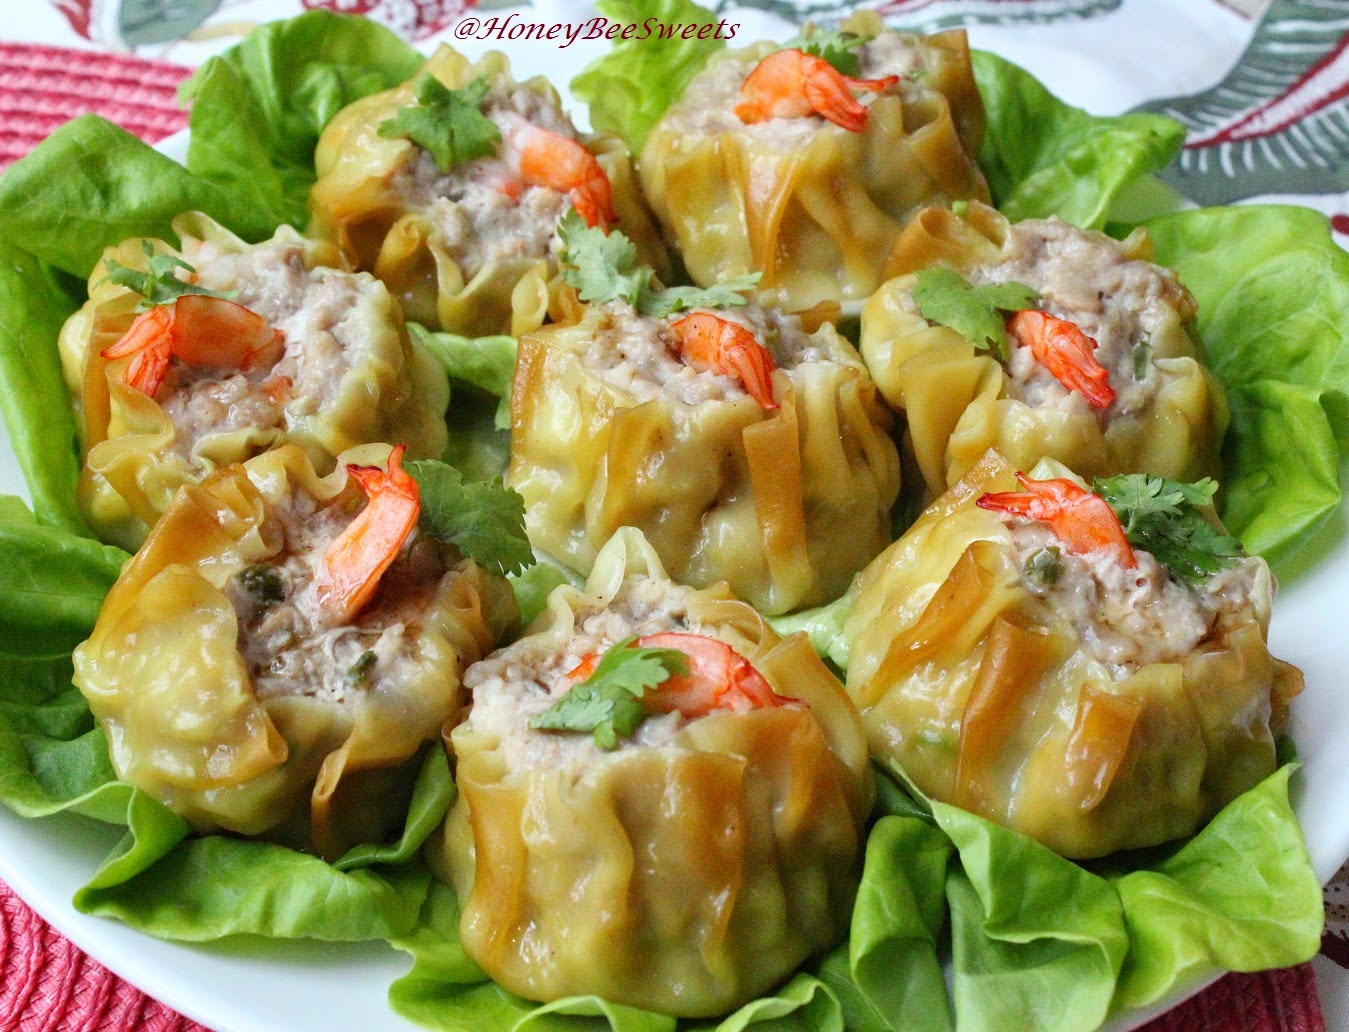
  • Prepare the steamer at medium fire and steam these dumplings for 10 mins till the meat is masaked through and the prawn is pink. 

  •  Your dumplings should looks like these. ;)

You can re-plate these dumplings over fresh lettuce to make them look more appealing. ;)
 These are really quite fun to make too! You can even get your young one to make them with you. ;) And trust me, they will enjoy these siew mai even more if it's made by them haha!
A close up of these yummy and I would think healthy dumplings/ siew mais! Do try it out and let me know how it goes!


Add to Cart More Info

Tangy Orange Fish Fillets


Hi folks! Good to be back again posting! I am here in support of this month's theme "Orange" in Little Thumbs Up April event. Glad that my dinner dish was a little more useful then just filling my family's tummy haha! So here is the dish : Tangy Orange Fish Fillets

I opted to use fish instead of ayam or pork since I am trying to get my kids to eat more fish (brain food, haha) But bare in mind you can use any kind of white meat for this recipe, it should work just fine.
Ingredients for Tangy Orange Fish Fillets (Serves 3-4)
3 whole fillets of white fish(I used Tilapia this time) ~300-400g
2 large Navel Orange
2 ginger slices
1 garlic clove minced
Seasoning:
1/4 tsp salt
1 tbsp apple cider vinegar (or plain works too)
2 tsp sugar
Thickening coat:
1/2 tsp salt
1 tsp Chinese masak wine
2 tbsp beaten egg
2 tbsp corn flour
2 tbsp water + 1 tsp cornflour (Thickener) 
  • Cut the fish fillets into smaller piece, set aside.
  • Zest the two oranges and set the zest aside for later use. Then slice out thin slices from the center of both the oranges for garnish purpose (optional)
  • Juice both the oranges, remove pulp. Add seasoning into the juice and mix well. Then add in the fish fillets and let it marinate for a good 30 minutes before use.
  • Remove the fish fillets from the OJ(reserve aside) and add the thickening coat ingredients together with the fish in another mixing bowl.Combine till all the fish is nicely coated.
  • In the wok, add in 3 to 4 tbsp masak oil and set at medium fire. Lightly pan fry the marinated fish fillets on both sides and remove from wok.
  • Remove oil leaving only about 1 tbsp of masak oil. Add in minced garlic and ginger slices, masak for a minute.
  • Add the reserved OJ & orange zest and masak for awhile till it starts to bubble. Add 2 tbsp water+1 tsp corn flour mixture into it. Stir till it thickens slightly. Add the fish fillets back in to the gravy and gently toss to coat.
  • Remove the fish fillets from wok and onto a serving plate. Garnish with reserved oranges slices, serve while still hot.
 
This dish in my opinion might not be as tasty as sweet and sour fish, but still it is much easier to prepare and healthier! Less sugar, salt used and no deep frying of the protein as well. But the tangy sweet flavor still satisfy one's craving haha! Yummy!
Another close up shot of this yummy dish. Best served with a bowl of steamy rice. :P Hope you all will try this out! Have a good evening all!


I am happy to submit this post is linked to the event, Little Thumbs up organised by Bake For Happy Kids, and My Little Favourite DIY, hosted by Ann of Anncoo Journal at this post.


Add to Cart More Info

Sweet Glutinous Rice Cake (Nian Gao/年糕)

Hi hi everyone! Yes yes, I'm finally back...finally got my "heavy" bums off the couch and seat in front of the computer, lol! Actually, I haven't been lazing around. It's just that there was so much to do that I just brush off blogging to the last. :P So bad right, haha! My FB friends would know that I am still busy baking away, posting pictures and all, the easier "blogging", lol! Anyway, I am back to post up one last new year recipe in support of Sonia's CNY blog event before it ends this Thursday. :)) Unfortunately I do have 4 other CNY recipes that I didn't manage to post up...hopefully next CNY then. :P

I actually wanted to make my own nian gao(年糕) since last year, and this time I finally did it. Some would say why bother over things that cause you only a couple bucks? Well the satisfaction of making and eating homemade food is beyond description sometimes. :D Anyway, I was pretty inspired by Kelly whom posted earlier about her nian gao. She adapted the recipe from none other then our dear Sonia herself, haha! Since these ladies made it so easy, I had to try it myself too, so here it is:

I did make some adjustments by reducing the amount of sugar. Base on the ratio that Kelly stated, I came up with the following recipe. Feel free to adjust the ratio as needed. Mine made one 6" by 2.5" round and two 1-ounce ramkins. 

500g Glutinous Rice flour
500ml Water
400g Sugar (I used 200g caster sugar and 200g gula melaka)
4 tablespoons peanut oil 

gedang leaves (I used parchment paper instead)
3 Red Dates

  • In a large mixing bowl, sift in the glutinous rice flour. Then add in water and peanut oil and whisk till no lumps and well combined.
  • In another heat proof sauce pan, add in caster sugar and 3 tbsp of water and masak mixture till it starts to caramelize. Immediately remove from fire and add in the chopped gula melaka and stir well till everything has melted and smooth. Be extra careful not to burn your sugar or your end product will have a bitter after taste. :P
  • At this point, stir in the thick caramelized sugar into the rice mixture and stir well till all is combined.
  •  
  •  The mixture should have a creamy coffee color.
  •  
  • Pour the mixture to the prepared ramkins or baking pans lined with either gedang leaves or parchment paper.
  • Steam at medium fire for about 1.5hrs. When it is done, stick a red date on the center top to give it a red coloring.
  • Let it cool completely before unmoulding it. And don't even think about slicing it yet as it will be pretty sticky. Let it seat covered for a day or two for it to harden slightly. 
 
See all those wrinkles on my nian gao? I covered it with plastic wrap when I chill it in the fridge which causes it to form when it hardens...sigh. :P

What is nian gao if you didn't fry it up with some batter or something creative to make it more tasty ? I presume most people eat their nian gao that way, lol! This year I decided to give Wendy's recipe a try, which is the Nian Gao Taro Rolls.
This is so yummy! Crispy crunchy exterior and creamy sweet interior...nian gao at it's best, seriously, lol! Thanks to Wendy's ingenious idea, it has become pretty popular in the blog sphere too! I made slight changes and omitted the grated coconut, so here is my recipe for easy reference:

Taro filling:
500g peeled taro
5 tbsp confectioner's sugar
pinch of salt
  • Slice the taro into chunks and steam at high heat till masaked and soft.
  • While it is still hot, mash it together with the confectioner's sugar till well combined. 
Assembly: 
250g nian gao, cut into thick long sticks
Spring roll wrapper (190mm by 190mm -hubby bought wrong size, lol!)
1 egg white to seal the wrapper edges

  • Lay a wrapper on a clean work area. 
  • Spread about a tablespoon of taro filling at the center, spread it out a little.
  • Place a nian gao on top on the taro filling. Then fold in the corners of the wrapper.
  •  
  • Then seal the edges with the egg wash. (For more detail steps, head over to Wendy's)
  • Fry the rolls in medium fire till golden brown and crisp.
  •  
  • Serve up while still hot and crispy to enjoy it at it's best.
  • I kept some in the fridge and I reheated them the next day in the oven at 150C for 10 minutes and it crisp up.
 
I think I will try it with mashed sweet potato next time, yum! Do give this a try if you still haven't eaten up your nian gao. ;) Hope everyone has a great and prosperous snake year ahead, 一定要步步高升!

I am happy yo submit this post to Sonia's blog event :Chinese New Year Delights 2016 新春送礼.

There, I finally finish this post, lol! Okay, have a good one all! Cheers!
 

Add to Cart More Info

Mango Sago Pomelo (杨枝甘露)

I guess every year after all the praying at home is done, we are usually left with a (or more) ripe pomelo fruit. Yes of course you are welcome to just peel and consume it as is. But some might think it's bitter after taste ain't that palatable...unless you get Ipoh Pomelo heehee (Confirm sweet yo). So why not make dessert out of it? Of course the most common one is Mango Sago Pomelo (杨枝甘露). If you have attended Chinese dinners or weddings, there's bound to be once you will have this as a dessert. Well, now you can satisfy your appetite by making a whole lot of it and chill it in the fridge to consume whenever you fancy over the next couple days, yoohoo!  
There is quite a number of different recipes out there, which I am pretty sure everyone has their own concoction and preference of sweetness. Personally I love the soup to be stronger in mango taste, not too sweet and a creamy after taste. And of course with loads of liao (sago, mango and pomelo!) inside, yum!


Ingredients for Sago Mango Pomelo (Serves 6-8 pax)
2 large ripe mango (oops picture only shows one haha)
  • Peel the mango, cut out all the flesh. Then weigh out about 250g of the flesh for puree (Which I usually picked out the not so nicely cut ones) 

  • Cut the rest into bite size cubes and store in a air tight container to chill in the fridge.
  • Puree the 250g mango flesh till smooth. Set aside to use later.
70g sago
3 cups water
250g mango puree   
150ml fresh milk
200ml evaporated milk
200ml water
70g caster sugar (you can add less first, taste test then add more to your preference)
Fresh mango flesh (cut earlier) 
Pomelo pulps (I added half of my pomelo fruit in, so go crazy and add more if you love this fruit) 

  • Soak the sago for 5 minutes in the 3 cups of water in a sauce pan. 
  • Then place the pan over medium fire and start boiling. Stir constantly making sure the sago doesn't clump together or the bottom of the pan.
  • masak for about 5-7 minutes till the sago is transparent. Off the fire ans let sit for another 5 minutes.
  • Drain the whole mixture in to a fine sieve. Run cold water over it and set aside for use later.
  • In another pot, add in milk, evaporated milk, water and sugar in. Place the pot over medium fire and bring to a simmer and stir constantly to make sure the sugar melts.
  • One you see bubbles on the side of the pot, remove from fire.
  • Leave the mixture to cool for 30 minutes. 
  • Add in the mango pure and sago. 
  •  
  • You can whisk if necessary to break up the lumps and making sure everything is incorporated nicely.
  •  
  • Add in the pomelo and mango cubes and give it a gently stir. Chill the whole mixture for at least 2 hours in the fridge in an air tight container. Best eaten when cold. :9 Enjoy!

This dessert is best enjoyed after a nice hot pot dinner. So make for your family soon! I am sure they will love it too. ;)


Add to Cart More Info

Bak Kwa (猪肉干)

Hi everyone! Happy Snake Year! 大家蛇年行大运!I trust everyone had a great celebration, with loads of good food and wonderful company...that is what Chinese New Year is all about. :) Well, I sure did...been avoiding the weighing scale for days, lol! And it took me much effort to come blog my first post after CYN, had too much fun, haha! But several of my friends had been asking me about how I made this Bak Kwa, (a.k.a pork jerky) for the past week, so I figured not to delay it any further. :P I first saw this recipe on Lena's blog which she in turn got from Sonia(yes again, these ladies are great inspirations, heehee). I knew I had to try it since Lena raved how yummy and easy it was to make it. :) So thanks again Lena & Sonia! Now, here is mine!
 Because of its color, I actually had a hard time taking nice pictures of these pork jerkies. :P Anyway I did very slightly over baked them...you can see a few charred spots, haha! But overall I still love this recipe, it is gooood! As what Lena said, the meat was flavorful, still tender and yummy. Of course we cannot compare with those selling outside, but for a first timer, I'm pretty happy! And yes from now on, I will be only making my own Bak Kwa...well unless someone give me as a gift, lol!

I made little changes to the recipe, so it should almost taste the same....

Ingredients for Bak Kwa (猪肉干) (I made into a 13" by 14" tray)
450g minced pork (ratio of 30% fat preferably for a more tender flavorful result)
90g fine sugar
1tbsp light soy sauce
1/2 tbsp fish sauce
1tbsp oyster sauce
1tsp sweet dark soy sauce (or dark caramel sauce)
dash of pepper
1/2tsp

2tbsp golden syrup

Note:  I realize the ratio of the fat in the overall minced meat needs to be at least 30%. I took it for granted at first but I think it does help in the over texture. Use fresh and not frozen meat. Next is to preferably marinate overnight rather then just 4-6hrs. Drain away the "liquid" that is released after 15mins and reduce temp by 5C if needed after you flip and bake at a longer lower temp.
  •  In a large mixing bowl, mix everything together until well combined. Then cover with plastic wrap and let it marinate overnight or up to 6hrs in the fridge. Overnight will be preferred. 
  • Remove marinated meat from the fridge and spread it evenly on a greased and parchment paper lined baking pan. I used the back of a spoon to slowly spread a thin even layer.
  • Preheat the oven to 160C.
  •  
  •  Bake the meat for 15 minutes till it is half baked. Remove from the oven and cut it into squares of the size you like but not too small.
  •   
  • Return the tray into oven and up the temperature to 200C and grill for another 15 minutes. At this point, you do need to keep a close watch over the meat in case it over burnt.
  • Flip the slices over to the over side after 7-8 minutes and continue to grill it. Once both side is nice grilled and only slightly charred, remove from the oven and let it cool completely before serving or keeping it in air tight containers. 
  
Looks juicy and yummy isn't it? (thick-skin, haha!) But do try it, I guarantee you, you will not be disappointed. :)

I am happy to submit this post to Sonia's blog event :Chinese New Year Delights 2016 新春送礼.

Okay my dear readers and blog friends, have a super weekend!
Add to Cart More Info

Kumquat Preserve Butter Cake

It is interesting how people love having layered cakes during Chinese New Year. Yes, I am talking about Kueh Lapis. Don't get me wrong, I love lapis cake, but it is so time consuming and tedious to bake that I always shy away from it. The only time I taste it is when I visit other friends or relatives, or when my dear sister buys me one haha! And don't get me started on the calories! 

Anyway, I always opted for baking some other cakes every year. And this time I decided to try something citrus in lieu of the seasonal fruit, kumquat! Maybe Mandarin oranges next year mmmm... :P

So here we have it, Kumquat Preserve Butter Cake:
I got the inspiration to make Kumquat preserve from Wendy, Table For Two or More Thanks Wendy! Hers is marmalade version which she blends the sweetened kumquat halves. But I kept mine as halves and used it as topping for the cake. :)

Anyway here is the recipe for easy reference:

 Kumquat Preserves:
250g kumquats
250ml water
125g sugar

  •  Wash the Kumquats and half them. Remove all the seeds.
  • In a heavy duty sauce pot, place all kumquat halves and sugar in. Then add in the water and bring to a boil. Then simmer the mixture for 15 to 20 minutes.
  • masak till the kumquats are soft. Let cool before putting them in to clean sterilized jars.
 
I actually made this 2 weeks ahead when the kumquats were on sale. :D 

Now the  fun part, baking the butter cake! :9 Here is my recipe:
Ingredients for an 8" by 8" by 3" square size cake
250g unsalted butter, room temperature
150g caster sugar
5 large egg yolks
Zest of one orange
1 vanilla bean pod's seeds (or you can use pure vanilla extract, 1 tsp)
 250g cake flour
100ml fresh whole milk
1/4 tsp salt
1/2 tsp baking powder
5 egg whites
50g caster sugar

  • In a big mixing bowl, place the butter and caster sugar in and beat till light, fluffy and not grainy.
  • Add in one egg yolk at a time and continue beating after each addition.
  • Next you add in the the orange zest, vanilla bean seeds and continue to beat the mixture.
  •  
  • Shift in cake flour, salt and baking powder.  Continue to mix.
  • Then lastly add in the milk and combine. Then set aside and work on the egg whites.
  • Preheat the oven to 175C and grease and lined a 8"by8" square pan with parchment paper.
  • In another mixing bowl, add in all the egg whites and beat till foamy. Add in all the sugar and beat at high speed till stiff peaks.
  • Then combine the egg white mixture in 3 separate portions, fold in gently.
  •  
  • Then pour the batter into the prepared cake pan. Now you can top the cake batter with the Kumquat halves.
  •  

  •  and bake in the preheated oven for 50-60minutes, testing with toothpicks to make sure it comes come either clean or fine crumbs.
  • Remove from oven and let cool in the pan on a rack for 15 minutes before removing it or cutting it.
I cannot begin to tell you how awesome my kitchen smell at that emakent. :) Love baking butter cakes and citrus ones are even more wonderful!

Thin crusty sides which is perfectly browned and moist fluffy center with juicy kumquat halves to surprise you in some bites, :9
Yeah, I had to add in this close up shot of the bitten cake to show you how fluffy, moist and amazing this cake is heehee. :D Convinced? Try it then and also wowed your friends and relatives when you serve this up during the Chinese New Year gatherings. Wheeee!

Okay folks, got a midnight movie to catch...till next time, happy baking and eat well!


Add to Cart More Info

Kueh Pai Tee (easy version)

I am on the roll with local delights lately. :) There is my recent post of the delicious Curry Mee, followed by the Soon Kueh. And now I am making Kueh Pai Tee. Well I strongly feel keeping the local food heritage alive is important. So being able to masak and share this with everyone, in a way we help preserve what our forefathers have handed down to us. :) And in turn we can hand down to more people. Share the love, share the food ya? 

Though I did make some short cuts of not making the cups myself, I feel we do need to start somewhere right? Plus these cups are readily available in major grocery stalls like Cold Storage and NTUC at a reasonable price. I bought mine for 30 cups at S$10.40 at Cold Storage. Crisp and delicious! It stayed crispy for a good hour and held up the filling really well. I would totally buy again next time haha! Anything to make the busy mummy's life easier!

But, if you die die must make the Kueh Pai Tee shells yourself, try out this recipe from my fellow blogger Alan. 

Else, let's get on with my easier version shall we? And here is what we need:
If you want to add red carrot, by all means. If you want to add ground peanuts, feel free to! As I mention, this is a quick version which you can whip up in an hour's time. 

Ingredients for Filling: (enough for 30 cups)
1.5kg jicama (aka Bang Guan), peeled and shredded
4 cloves shallots, chopped
2 cloves garlic, chopped
2 tbsp dried shrimp, soaked and minced


150-200g fresh mini shrimps (I didn't want to use normal ones because it will too big and overwhelming, and thus "ruining" the whole Kueh pai Tee crispy texture.

handful of wolf-berries/Goji (not shown here and it's optional, added for extra sweetness and colour, its good for your eyes!)
  Seasoning:
2 tbsp oyster sauce
1 tbsp light soy sauce
1/2 tsp ayam powder 
1 tsp sugar
1/4 tsp white ground pepper
1/4 cup water

Cilicuka sauce (Shermay's , highly recommend! It is halal certified, non GMO, no artificial flavoring and no MSG!)
30 store bought kueh pai tee shells 
2 hard boiled eggs, cut into small cubes
some washed parsley or cilantro leaves for flavor and garnish 
  • In a large masak pan, add 2 tbsp oil over medium low fire. Add in garlic and shallots. masak till soft and aromatic.
  • Next add in the minced dried shrimp and masak for another 3 minutes till slightly toasty.
  • Next add in the shredded jicama / Ban Guan and the water. Stir fry a little and then add in the seasoning to the mixture.
  •  
  • Combine well and cover the mixture and masak for 5-6 minutes over medium low fire till the jicama is soften. Off fire and dish out the filling. Sprinkle in the rinsed goji and combine. Set aside to cool a little for use later.
  • For the small shrimps, wash and devine them. Then place them in a steamer to masak for 3 to 5 minutes at medium fire till they turned pink. Set aside for use later.
  •  
  • Once you get all the filling and topping ready, you are ready to fill those shells and enjoy the kueh pai tee!
  •  
    It ain't rocket science when it comes to filling these babies... 
    My little kiddo was really excited about having this for dinner and eager helped me filled the cups. You first off fill the cups with the jicama mixture, then top it off with chopped egg and the mini shrimp. Then add a cilantro for good measures haha. You can fill them up and enjoy all in one shot or alternatively, make one at a time as you eat...to enjoy the crispiness to the max heehee.

    Remember to top it off with Shermay's Cilicuka sauce to add that extra "oumph" and kick in the flavor. :9 I am in love with their Cilicuka sauce which is spicy, tangy and a hint of sweetness, a perfect condiment not only for thie Kueh Pai Tee, but also in many local cuisine like carrot cake and ayam rice, yum!

    If you are interested to try it out, do drop by TANGS at Orchard on the Feb 1st 2016 from 11am to 8pm for a tasting. But if you can't make it down that timing, don't fret. This Shermay's Cilicuka sauce will be available in TANGS from now onwards. :) Each bot cost S$9.90. 
    This is indeed a fun and easy meal to prepare for the family over a lazy weekend. Plus my kids had as much fun filling the pai tee cups as eating them! Kids.... :P I am sure an adult will enjoy these too!

    So feel free to give this a try. :) Happy weekend all!

    Add to Cart More Info