Showing posts with label rice. Show all posts

California Maki -AFF featuring Japan

Oh my, this is bad. Bad as in I am gone too long and still feel comfortable about it, haha! Gosh, I seriously hope this ain't gonna become a habit! Anyways, Shan't waste time doing small talks, let's just get down to business. This is a much delayed post since I made this like 3 weeks ago haha! California Maki, a rather popular a kind of sushi roll, usually made inside-out, containing cucumber, crab meat or imitation crab, and avocado. In short, it is delicious sushi, haha!


Ingredients for California Maki (Serves 3)
1 cup sushi rice (unmasaked)
1/2 tsp Japanese rice vinegar
1/2 tsp mirin
  • masak the rice as per normal. Once done, add in the vinegar and mirin and gently fold in to combine. Let rice cool before use
~3-4 tbsp tobiko
1 ripe avocado, peeled, cored and sliced into 8 equal strips lengthwise
1 Japanese cucumber, also peeled, removed seed portion and cut lengthwise into 4
8-10 strips of imitation crab meat
2 egg, beaten and pan fried, cut into strips (Optional)
Some Japanese mayo
4 nori sheets

You will also need:
Bamboo mat
Saran wrap
  • I usually will wrap the bamboo wrap so that the rice will not get in between and hard to wash up later.
  • I cut the nori sheets into half.
  • Place about 3 to 4 tbsp amount of sushi rice and press down so that the rice stick nicely.
  •  Next you gently flip the nori sheet over and rice facing down.
  •  Place the avocado, crab meat and cucumber on top. At the same time, squeeze some Japanese mayo on top.
  •  Then roll it up tightly. If at this point you find the ingredients are "oozing out", it means you have place too much ingredients. If you prefer having more ingredients, you might not want cut the nori sheets into half.
  • Using a teaspoon and sprinkle/press the tobiko over the top surface of the sushi roll.
  •  Then place a saran wrap over the top and then gently using the bamboo shoot and roll it up to press down the tobiko.
  • Unwrap the bamboo and saran, then using a sharp knife to cut the sushi into half first. Then cut each half into 3 equal portions.
I actually kind of enjoyed making this California maki. In fact I love making sushi for my kids and this inside out version was kinda of a challenge haha! But definitely worth a try if you love sushi, :)
I am happy to submit this to this month's Asian Food Fest #1 Oct 2016 : Japan, hosted by Alan from travelling-foodies
Have a good night all!
Add to Cart More Info

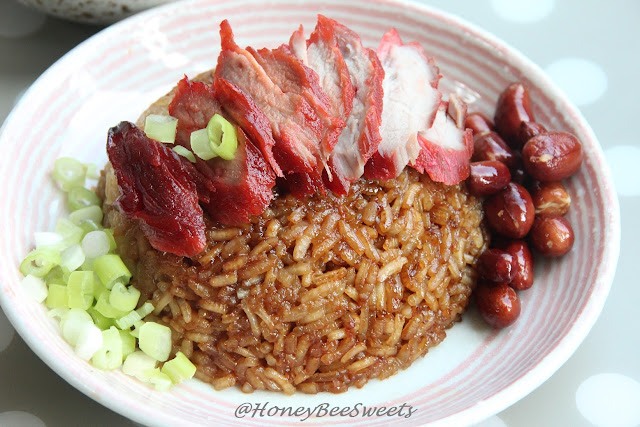
Kampar Lor Mai Fan (Glutinous Rice) - MFF featuring Perak

I am so glad that the term exam is finally over and now I can have some spare time to blog. Have been busy baking and masak non stop I assure you but just didn't find time to blog about all those recipes. It looks like I need more motivation to sit in front of my lab top nowadays. :P Anyway, I did gave my word to Wendy that I will make this Lo Mai Fan earlier this month, so here it is!

Personally I love any kind of glutinous rice dishes, Puen Kueh, Lo Mai Gai and Hokkien glutinous rice and now this! This Kampar Lo Mai Fan is indeed quite delicious with its unique serving of curry sauce with it. Love! H

I have adapted the recipe from none other the Wendy. However I did omit the pork fat because it just slipped my mind to buy a piece of pork fat, hahaha! Anyway, here it is:

Ingredients for Kampar Lo Mai Fan (Serves ~6)
Red Roasted Char Siew Pork
300gm pork tenderloin
60gm sugar
30gm light soy sauce
1/4 tsp salt
1 Tbsp rose wine (Mei gui lu)

some red food coloring gel


In a small mixing bowl, add everything in except the pork and mix well. Pour the mixture into a big ziplock bag and place the pork tenderloin in as well. Seal tight and let the pork marinate in the sauce for a good 6-8 hours before use. Bake in oven for 20-23 minutes in 200C. Remember to let meat cool completely before slicing.


300gm glutinous rice
1 heaping tbsp of dried shrimp, soaked and chopped finely
3 shallots, minced
2 clove garlic, minced
1 tbsp oyster sauce
2 tbsp light soy sauce
2 tbsp dark caramel sauce
Salt if needed
Boiling water

  • Soak the glutinous rice for at least an hour before use.
  • In the meantime, prepare the steamer to a small rolling boil.
  • In a small pot, fry the shallot till its all golden and crisp. Dish out and set aside.
  • In another masak pan, add in some masak oil at medium fire. Add in the garlic and chopped dried shrimp in and masak for a couple minutes till fragrant. 
  • Drain the rice and discard soaking water. Then add in the soaked glutinous rice into the masak pan and stir to mix well.
  • Add in the seasoning to the rice and stir fry till it is uniform in colour.
  • Add in the fried shallots and stir to combine. masak for about 2-3 minutes.
  • Now transfer the rice into a taming vessel and add water to just cover the rice. Steam at medium high fire till the rice is masaked, about 20-25 minutes.
  • Remember to let the rice cool first before scooping it, this allows the rice to firm up a little and not get all mushed up when you scoop.

Assembly
1/2 cup fried peanuts
Spring onions, sliced

Red roasted char siew
  • In a small oiled bowl, scoop in some steamed glutinous rice in and press it down to level.
  • Then carefully invert the rice over a serving plate.
  • Garnish with juliened green onions, fried peanuts and top with sliced char siew.
  • Serve with curry sauce if desired.
Oh how I love the crunchy peanuts with this Lo Mai Fan, hahaha! And the curry, yes the curry sauce....didn't know it taste so good with curry!
For the curry sauce, please refer to here for more details.

I am more then happy to submit this post to this month's Malaysian Food Fest Perak Month hosted by WendyinKK of Table for 2 or more

Thanks for staying with me and bearing with me for my absence!
Have a great day everyone! Its TGIF tomorrow! Yay!

Add to Cart More Info

Onigirazu (Japanese Rice Ball /Sandwich)

What is Onigirazu? For the benefit of those that has never come across this term, "onigiri" means Japanese rice ball, and this reinvention of wrapping rice with seaweed has evolved into another form. Rather then the usual round or triangular shape, onigirazu takes on the shape of a flat rectangle, much like a rice sandwich in seaweed. :)

I think this is such a fabulous idea if you ask me. So much easier for busy mums to prep this! And my kids are such onigiri fans, they can eat this everyday. So I reckon I post this up so all you mummies or just onigiri fans can try this out. ;) I got the idea from none other then my favorite Japanese Chef, Masa. 

This is just a short post to show how to wrap up the onigirazu because I find it a little challenging if I had not see the online instructions. Note that the filling ingredients used can changed according to your preference.

Ingredients for Onigirazu (serves 2 -3 pax)
3 sheets of seaweed
500 g masaked sushi rice
  •  masaked from 1 cup of raw rice. Once masaked, add 1 tsp Japanese rice vinegar and 1 tsp mirin

200 g fresh salmon, washed 

1 Japanese cucmber, peeled and 
5 crabmeat sticks, shredded and mixed with 1 tbsp Japanese mayo 
1 large beaten egg
  • Mixed with 1/2 tsp soy sauce, 1/2 tsp mirin. masaked at low fire on non stick pan. Dish out and fold in to a square form about 5 cm by 5 cm

Method:
  • First, place a plastic sheet on your clean work area. The plastic wrap must be at least 4 cm longer (length and breadth) then the seaweed sheets.
  • Place the seaweed sheet over the plastic wrap, centralize it.
  • Scoop about 100 g of the masaked sushi rice and place in the middle of the seaweed sheet.


  • Using your rice scoop, arrange the rie so that it is squarish form as shown above. Making sure you leave some allowance on the corner edges.
  • Next you add on the ingredients you want. I am using salmon mayo this time. Salmon is sautéed, flaked and added with 1 tbsp Japaese mayo, 1/4 tsp salt, dash of pepper and 1/2 tsp sugar. Mix well and use. 

  • Next arrange the cucumber strips over the salmon mayo.

  • Lastly pile on about 70 g of sushi rice over the cucumber. Bare in mind that we should try not to pack too much ingredient in the onigirazu, else you might just end up not being able to wrap it up nicely. :P


  • Press it gently so the rice is packed down on the other ingredients. Next you wrap up the onigirazu. Fold in the corners one by one.


  • You can wet the edges with water, but I find the seaweed tends to wrinkle very fast. So I suggest just let the moisture from the sushi rice to stick the seaweed together.


  • Next use the plastic wrap and wrap it up the whole onigirazu. Make sure it is tight so that the sushi will hold its shape when it is cut later.

  • Let the sushi sandwiches sit for 5 to 10 minutes or when you are ready to eat them before you cut them up. Do not unwrap, just cut together with the plastic wrap still on. Repeat with the rest of the ingredients till all is used. Feel free to double the ingredients for a larger party.


  • Serve the onigirazu as is. The kids will love them! Great for that quick lunch or even picnics. :9


I used mostly the basic ingredients. You can use avocado, egg mayo and even teriyaki pork belly can be used too. Yummm!

Do try this out and let me know how you like it! So simple and so good. ;)

Have a great day ahead guys!


Add to Cart More Info

Nonya Fried Rice - MFF featuring Penang

Looks like I am not slacking after all, haha! Coming up with another post 2 days later...even I am surprise with myself, haha. Cutting a little close to the dateline...but better not doing it at all right? (self comforting) Anyway, this last post for this month is Nonya Fried Rice which I again adapted from out dear Phong Hong, thanks so much my friend! 
I have to say this is indeed a very delicious and flavorful dish! Really different from your usual fried rice. :P Most of the "punch" comes from the dried shrimp and fresh sweet prawns, yummy! To think that I didn't add much seasoning to that big pot of fried rice. So delicious! I followed Phong Hong's recipe pretty closely this time, here is my copy of it.

Ingredients for Nonya Fried Rice (Serves 4)
1 tbsp garlic, minced
3 large eggs, lightly beaten and seasoned with 1 tsp soy sauce and a dash of pepper
2 tbsp vegetable oil
5 tbsp vegetable oil
5 shallots, sliced thinly
4 garlic cloves, minced
50g dried shrimp, soaked and chopped finely
150g prawns, shelled and deveined
3 dried shitake mushrooms, soaked till soft and sliced thinly
1 tsp chili paste (I added so little because of my kids)
3 cups of masaked rice, cooled or overnight

Seasoning:
1 tbsp light soy saucce
1 tbsp oyster sauce
1/4 tsp salt
2 tsp caster sugar
a few dashes of pepper
1/4 tsp dark soy sauce

Garnish:
Thinly sliced spring onions
Fried Shallot crisps
  • Heat up the wok and add the oil. Once the wok is hot enough, add in garlic and stir till aromatic.
  • Add in eggs and fried till golden brown. Break it up with the spatula into smaller chunks. Dish up and set aside.
  • Add the 5 tbsp oil at medium low fire. Add in the garlic and shallots and stir fry till aromatic. 
  • Add in the minced dried shrimp and sliced mushrooms and continue to cool till fragrant again.
  • Then add in the fresh prawns and masak till it turned pink. 
  •  
  • Add in the masaked rice, followed by the seasoning. Stir everything together till all the rice is coated with the seasoning and even colored.
  • Lastly add in the fried egg and stir in well. Dish up and garnish with spring onion and fried shallots. Serve while still hot. Enjoy!
 It looks so ordinary, but the taste is extraordinary! Simply heart this, even my family was all praised, haha! Am so glad I still managed to attempt this even it was so last minute, haha!

Okay, will again submit this to this month's Malaysian Food Fest Penang Month hosted by Alan of Travellingfoodies.

okay folks, have a great start next week!
Cheers!

Add to Cart More Info

Mango Sticky Rice (Khao Niaw Mamuang)

I can't even remember how many times I wanted to attempt making this dessert and forgo the idea in the end. Either I don't have mangoes or I run out of coconut cream, or I need to go on diet....like forever! But I am such a HUGE fan of Mango Sticky Rice, and would always try to order this at the Thai restaurants when I dine there. Com-on, who doesn't? Warm glutinous rice soaked in coconut milk, paired with juicy sweet mango fruit, it's heaven! Well....the only reason why I don't eat it that often is...ahem, the amount of calories and fat contained inside it! *Yikes* Okay lah, life's too short to avoid such delicious food altogether. So occasional indulge is totally permitted..unless your doctor says otherwise that is. ;P
Mango Sticky Rice (aka Khao Niaw Mamuang)..don't ask me how to pronounce that Thai name, is best made when Mangoes are abundant, sweet and in season of course. I much prefer Malaysia honey mangoes rather then Australia's mangoes which are in fact more expensive and contains more fire.

The recipe I used today is an adaptation of Angie's version from Seasaltwithfood. Thanks Angie!

Recipe for Mango Sticky Rice (serves 4 to 5 people)
2 large and ripe honey mangoes
250g glutinous sticky rice, soaked overnight, drained
100ml water

Mixture to masak with rice
180ml coconut cream/milk (I used AyamBrand coconut milk)
1 tsp salt
3 tbsp caster sugar
2 pinescrew / pandan leaves

Coconut cream to serve
125ml coconut milk
1 tbsp caster sugar
1.5 tbsp corn flour/ starch
pinch of salt
  • First of all, set up the steamer over medium fire. Drain the glutinous rice from it's soaking water. Place it in a steamer bowl and add 100 ml water. The water will help masak and soften up the rice faster. Steam for 30 minutes at medium fire and give it a stir at mid point of 15 minutes. (You can wrap with plastic wrap to prevent excess water from dripping in)
  • While the rice is steaming, prepare the sweet coconut cream for serving over the dessert. In a small sauce pot, add in the coconut milk, salt, sugar and corn flour in.

  • masak it over low fire and keep a close watch not to let the mixture burn. Stir it constantly and make sure no lumps form at the base. Once the mixture thickens, remove from fire and let cool. Scoop out the cream and set aside to serve later.
  • Next you make the coconut mixture for the glutinous rice to soak in. Using the same pot you used for the coconut cream sauce, so you wash one less pot haha. Similarly, add in the coconut milk, pandan leaves, caster sugar and salt.
  • Stir well till all the sugar has melted in over medium low fire. masak the mixture till it comes to a simmer for 3 minutes and off the heat.
  • Add in the steamed glutinous rice at this point and toss to coat the rice with the coconut milk mixture.
  • Place the coconut rice mixture back in the steamer bowl and in the steamer to keep warm before serving. 
  • Now you cut up that sweet mangoes, place them on the serving plates. Scoop some warm coconut glutinous rice on the plate as well. And finally some sweetened coconut cream over the rice.
  •  
  • Just like that, serve it up and enjoy when it is still warm....yummm! :9
Simple as that... steam rice, masak creams and cut fruit! Now you can enjoy this authentic Thai dessert right at home (no service or GST) and with extra servings too!
 Hope my post has inspired you to try masak this at home...especially it is Mango season now! It is gonna taste way better then any ones you've had before...because it is made by yourself. ;) Wait no more, start masak guys!  :D
 
Have a fabulous day ahead!
 
Add to Cart More Info

Black Glutinous Cupcakes (Pulut Hitam Cupcakes)

If you have been an avid reader of Christopher Tan's work, be it his webpage at www.foodfella.com or the fortnightly food column in The Strait Times, you would have already heard of his latest, greatest creation. His new masakbook, the  "NerdBaker", published by EPIGRAM Books. So you must be wondering why am I writing about him? Well, firstly, I happened to be invited to attend his book launch last week...yes, felt so privileged! Of course I got to meet Christopher himself. Nerd or not, he was definitely a walking encyclopedia on food. You can sense his passion, not just in baking, but to share his knowledge on how to bake better and more delicious food. And that book, "NerdBaker" also showcased what he has researched, tested (tasted of course) and presented to you in the most detailed manner on how to replicate his wonderful recipes.

The other main reason why I love about his book is that he incorporates local flairs or flavors into his bakes. Like Pulut Hitam (Black glutinous rice), lemongrass and even miso, into cakes and pastries. Some recipes are just plain exciting, like the Bacon Kouignou-Amann, Chocolate Matcha Macaron Tart and Intelligent Black Rice Cake! I am literally planning which day I can try these recipes out! Be still my heart, haha! 

I really wanted to try his recipes even though it has been a crazy busy weekend...I opted for an  easier recipe in the book; Black Velvet cupcakes. Why black, what makes it black? Bamboo charcoal? Super Black Chocolate? Neh...it is Black glutinous rice flour, aka Tepung Pulut Hitam.
Kind of black I know. But they are Black Velvet cupcakes right haha! Some how mine didn't turn out as pretty purplish-looking as Chris's version in the book, which I think he uses grains from different country maybe? But I am pretty sure the taste is almost as awesome as his...because these babies are delish!
Due to Copyrights reasons, I won't be able to share Christopher's original recipes here. But I bake a varied version which I made several changes to the original recipe. Changes which I felt will not alter the "integrity" of this wonderful recipe. ;) But bare in mind this is my own creation and has in no way trying to replace Chris's recipe. And that is why I named mine Black Glutinous Rice Cupcakes instead of Black Velvet Cupcakes. So ya...try at your own risk heehee...

Recipe for Black Glutinous Rice Cupcakes (Makes 10-12 3-ounces cupcakes)
125g  Black Glutinous Flour (See *Note)
125g cake flour
1/3 tsp salt
2 tsp baking powder
120g caster sugar
2 large eggs
1 tbsp of wild flower honey
150ml coconut milk (I used Ayam Brand canned coconut milk, really good!)
50 ml fresh white milk (I will try buttermilk next time!)
80g unsalted butter, melted and cooled
40 ml cold pressed coconut oil (I bought mine from California during my last trip back "home")

*Note : The last time I "encountered"black glutinous rice flour was actually from a nice blogger friend whom bought a pack of the flour for me when she return from Batam. I have tried searching for it here but couldn't find any. :P So I took up Chris's advice in the book; that is to buy raw black glutinous rice grains, freeze them hard and blend them with a high wattage blender till powdery form. 
To ensure the flour is fine enough, sieve it through a fine sieve. Repeat the blending on those bigger grains till all is finely ground till flour form. Store in air tight containers for use later. Should stay fresh for a good 2-3 weeks.

Method:
  • Combine the coconut milk and milk together in a heatproof bowl. Microwave it for 2 minutes on high. Or you can put in a pot over medium fire and masak till small tiny bubbles appear on the side. immediately remove from fire. DO NOT boil it. 
  • Add the black glutinous rice flour and salt into the heated milk. Give it a good stir till well combined. Let the mixture sit at room temperature for 20 minutes. (This step will allow the rice to absorb the milk and thus soften the grains more easily)

  •  In the meantime, prepare pan with cupcake liners. Preheat oven to 180C. Have a cup of kopi and chill till the alarm calls for you. ;)
  • Next you sift in the cake flour and baking powder in. Add in the 2 eggs, coconut oil, melted butter and caster sugar.
  •  Mix well with a whisk till well incorporated. 
  • Lastly, add in 1 tbsp of that wild flower honey. Hmmm...why honey in pulut hitam...why not gula melaka? I'll ask Chris next time haha!
  •  Scoop the batter into the prepared cupcake liners. Bake the cupcakes in the preheated oven for 14-16 minutes or till the cake tester comes out clean.

 Not hard to make isn't it? I think even my kids can do this! Perhaps the most tedious part was blending the black glutinous rice to flour.


 The taste is like eating "Orh-Bee-Ber" (Bubur Pulut Hitam) in cake form. If you are already a fan of this Black Glutinous Rice dessert, then you are gonna love this cake. Moist, fine crumbs and all so fragrant! It has this unique texture of slight chewiness...a true replica of a local flavor into a whole new form. A "form" even the younger generation will love, like my kids!


 I hope this recipe inspire you to try it out. It seriously taste better then it looks haha! Hopefully I will be able to try out more recipes from Chris's book...soon. ;)


If you are interested to get "NerdBaker" masakbook, head on to any major bookstores like Kinokuniya or Popular. Alternatively, Shermay's masak School in Holland Village also carries signed copies with an additional 10% off! Hurry! In case you wonder...No, I'm not paid to say any of the above, all view and opinions are mine. 

 Okay, signing off now, before the clock strikes 12am! 
Till next time, happy baking guys!

Add to Cart More Info