Showing posts with label breakfast. Show all posts

Cranberry Orange Wholewheat breakfast rolls

Tis the season to be baking. Fa-la-la-la-la, la-la-la-la! Haha, somehow I feel it carries more meaning when you bake for someone during Christmas. Well, it is a season of gifting right? Let's start off baking something with breakfast, Cranberry orange wholewheat breakfast rolls, sounds good isn't it? Saw this lovely recipe from Smitten Kitchen awhile back and had KIV it till now. My cranberries which has been sitting in my freezer was perfect for this recipe! Yeah...like FINALLY! Furthermore, with my new Jamie Oliver Terracotta dish from Tangs, I have all the more reason to bake it. :P

I can't imagine what's better then waking up on Christmas morning to this lovely breakfast. :) The amazing smell alone is able to drag you out of bed. Awesome. Cranberries are just so christmassy...I think it brings out the holiday mood!

I did some modifications to Deb's recipe, replacing plain flour to bread flour and also replacing portion of that bread flour to wholewheat flour. I also replaced the store bought buttermilk with homemade version (lemon + milk) and also added more milk to my recipe, which I think helps made the bread softer. 

With that, let's get down to it shall we?

Recipe for Cranberry Orange Wholewheat breakfast rolls (makes 12-14 rolls or 9X5" dish pan)

4 large egg yolks
1 large whole egg

50g caster sugar
85 grams unsalted butter, melted, plus additional to grease pan
175 ml buttermilk (I used 165ml fresh milk and 10ml fresh lemon juice)

100 ml fresh milk
Zest of 1 large Navel orange, finely grated (to be used in dough and filling, below)
350 g bread flour

120g wholewheat flour
7 grams or 2 1/4 teaspoons instant dry yeast
1 1/4 teaspoons coarse or kosher salt, or more to taste
1 teaspoon butter to grease the baking dish


Filling:
25g salted butter at room temperature 
150g packed light brown sugar (reduced)
130g fresh cranberries
Orange zest leftover from above


Icing: (Optional)
20 ml+/- orange juice (I used part orange, part lemon juice, because I love the tang)
120g powdered sugar

=> Mix everything together till you get a smooth, thick gooey paste
  • First, you weighed out the fresh cranberries and zap it in a blender till it resembles a thick chunky paste. Set aside in the fridge for use later.
  •  
  • Next you place all ingredients for the main dough into your mixer bowl and start to knead the mixture till it all comes together.
  • Continue kneading till it is pulling away from the side of the bowl completely and it is very elastic.
  • Grease another big bowl and place the dough in to proof for a good 1.5hrs to let it double in size.
  • Once proofed, punched out the air and place roll on a lightly floured work area. Roll out into a large rectangle about the 18" by 12" . 
  • Use a spreading knife, butter the whole surface leaving about 1" at the edges using the reserved room temperature butter.
  •  
  • Then sprinkle evenly the light brown sugar on to the surface of the dough. The follow by scattering the cranberry paste all over the surface as well.
  • Gently roll up the dough from the longer end and try to make it as "tight" as possible so you will get really nice swirls in the middle. When you rolled to the other end, pinch and seal the edges nicely.
  • Use a sharp knife, divide the log into 2 equal halves, then divide the halves into 2 halves. And repeat till you get 12. Grease the baking dish with some oil and place the rolls in, lining them neatly in rows. Rolls in rows, hah! 
  •  
  •  Again cover the rolls loosely with plastic wrap and let proof for another hour or so till it doubled in size. Alternatively, you can leave them to proof in the fridge overnight and bake them in the morning....nice!
  • Preheat the oven to 175C. Once the buns have finished proofing, bake in the preheated oven for 30 to 33 minutes till it is golden brown on the top.
  • Remove from oven and let cool a little before tearing into it and chomping it all down. Yes...a little self control is required haha.
  •  
Be still my heart....I know, such a glorious sight isn't it. And it smells and taste incredible too. :) 

    Such a genius idea to use cranberries as the filling I have to say. It's tangy, it's sweet, it's fluffy and it's comforting. You can make it a little more sweeter by coating the top with some icing. I opted for partly lemon juice because I find orange juice is not tangy enough to bring out the citrus flavor. Or you can opt not to put any icing at all of course. But again....

    Why not?

    Anyway....hope you like my rendition of this amazing recipe and give it a try. I am sure those that stuffed this in their mouths are gonna be super happy. :) And one last important note, make sure you have a nice baking dish to bake this...go treat yourself and grab Jamie Oliver's at Tangs haha!

    Till my next Christmas bake....stay happy guys!
      Add to Cart More Info

      Panda Buns (Cheddar and Cream Bread Recipe)

      So recently I have been seeing quite a number of Japanese bakers coming up with really cute bread bun designs. The bread buns are really so cute that you wonder if they will ever be eaten at all. (Might end up playing with them instead!) Being the practical me, I often question myself when it comes to whether I should spend such time to make these all too cute bread buns. If I ever do it, it'll be considered a luxury! But again, I have been into bento sushi art lately as well, which also consume quite a fair bit of my time....~haiz. Anyway, the Panda Buns I baked are considered easy, plus it is monochrome! Only 2 colours, how hard is that haha! I wanted to use my trusty White Bread Loaf recipe to make this so as to reduce the stress level. But opted to try a new recipe in the end because I'm always keen to new ones! So here is my Cheddar and Cream Panda Buns. 

      Okay I admit...I got lazy and didn't read up more about the temperature control part. But it was 10pm and I was ~yawn~, you get the idea. :P And hence the suntanned pandas were borned. :P Or should I say oven-tanned pandas. A friend then alerted me that I should have reduce the temperature to a low 150C, even though it did came across my mind before baking. But the thought of undermasaked gooey bread is just too overwhelming that I went ahead with the oven tan anyways....Haiz again~. However, other then that golden hue on these bears, I have to say it did turn out quite well! Agree? (Self-nodding.... -_-")

      So if you do want to attempt this out, feel free to use my White Loaf recipe and bake at a low 150C for 30-35 Minutes and see how it turns out. But bear in mind I did not use this White bread loaf recipe to attempt this at 150C, so I cannot advice you on anything. :) OOOooooorrrrr....you can hold that thought, come try out this Panda buns using the same Cheddar and Cream recipe like here at 170C. It's straight dough too,....read on!

      Ingredients For Cheddar & Cream Bread recipe (makes 8" x 8" square loaf buns)
      350 g bread flour
      1 large egg (48-50 g)
      100 ml fresh milk
      3 slices of Kraft cheese (~60 g)
      85 ml heavy cream
      1/2 tsp salt
      40 g caster sugar
      5 g instant active yeast

      25 g unsalted butter room temp

      1 tsp charcoal powder (I bought mine from Kitchen capers)
      1 tsp egg wash (for the eyes and nose to adhere to the dough)
      • In a sauce pot, add in the milk, cheddar cheese and cream cheese in. Heat it at medium low heat, and stir well till mixture melts. Set aside to cool before use.
      • In a mixer bowl, add in bread flour, egg, salt, caster sugar and yeast. Pour in the cooled cheese mixture.  

      • Beat the mixture till the dough comes together. Continue to mix, it will be sticky at first but just continue to mix with time durations of 5 minutes mix, 5 minutes break and repeat. The dough will eventually become less sticky to the touch.


      • You can add in the room temperature butter and continue to beat the dough. It will then finally pull away from the sides and become very elastic.

      • Remove the dough and grease the bowl. Place the dough back in and let it proof for 1.5hrs or till it doubled up in size. Like seen below:

      • Punch out the air and knead the dough a little. Divide out 16 dough portions of 40 g. The remaining dough is set aside for use later.
      • Roll the 40 g dough portions round and place them in a 8" by 8" greased square pan.

      • Continue till all the dough portions are rolled and placed in the pan. 
      • Next you add the charcoal powder to the remaining dough that was reserved earlier. It should weigh about 60 g if I remember it correctly. Knead well till the dough is uniformly black.
      • Pinch pinch out about 1.5g to 2 g worth of dough and roll it round. Then place 2 of these small round black balls on the top of each dough portion in the pan. These will be the ears of the pandas.

      • Repeat till all the ears are made and placed on top of the buns. 
      • Using your finger tip, carefully rub the place where you will be placing the eyes and nose on the buns.


      • Preheat the oven to 175C right before you are going to work on the eyes and nose portion of the Pandas.
      • Next, pinch about 1 g of the black dough and press it flat till it is oval shaped. Carefully place the oval on the dough top to make the eyes. Pinch a small bit of the dough to make the nose. Note that all these are rough estimate of the dough, I feel it is too much of a hassle to weigh out such a tiny portion of the dough. So just try your best to make a rough gauge on the eyes and nose bread portions. Repeat till all the eyes and nose is made.


      • If the buns has already been fully proofed like showed above, bake it in the oven for 26-28 minutes covered with aluminium foil (yes I covered but till browned  :P). 
      • Once baked, remove from the oven. Also carefully remove the buns out of it's pan so it can cool over the rack completely before eaten.


      I am glad the eyes and ears and noses (except one) were still in tact when I removed the buns out from the pan. :) So the egg wash does help to adhere the dough nicely. I shall make sure I use a lower temperature next time at 150 C and see if it really stays white and pale!

      The texture? Let's see....
      What do you think? Nice right?! I am pretty please with it myself too! Soft and with a slight bite to it, just like the way I enjoyed my breads. Although it might not be as soft as my White loaf bread recipe, this bread still radiates a nice creamy, cheesy aroma. If you like a stronger cheese, please by all means, use that. And do let me know how it turns out for you. ;) Last but not least, hope you have fun baking these pandas, I know I sure did. 

      I can't wait to try out another fun shape...what do you suggest?? 

      Okay, I gotta go guys, thanks for reading!
      Remember, do what you love and stay happy!

      Add to Cart More Info

      Hokkaido Milk Loaf (北海道面包)

      I often asked myself, why have I not attempt to bake one of the top favourite bread loafs around. If you are wondering which one I am referring to...well, it is none other then the Hokkaido Milk Loaf itself. Perhaps I have been waiting for the right Hokkaido milk to come by? ~Excuses Or maybe I needed to explore more in this dairy product. Or perhaps I just didn't quite come up with the right recipe as yet. 

      I was perfectly happy with the usual brands on the dairy aisle. It just never occurred to me to try Hokkaido fresh milk. Well, until I got to taste Yotsuba's Hokkaido Fresh Milk. Yup, it was my maiden "encounter" with Hokkaido fresh milk. 

      Yotsuba Milk Product Co., Ltd. has been in this dairy business for more then 5 decades which they were established in 1967. Yotsuba seeks safety and top quality milk for their consumer by pledging to value nature status, delivery safety and high-quality goodness. And in order to harvest top quality milk, the company raise their milk cows in a no-stress environment where the animals roam freely in the vast green pasture in Hokkaido. And with the care and attention from the dedicated farmers from Yotsuba, those happy cows produces quality milk. From raw fresh milk, to processing, to packaging and right to the consumers' door steps, every glass of creamy goodness is ensured at it's best quality.

      I can understand why the pricing is fairly higher ($6.45 each liter) then the usual milk brands. It having a more superior taste and that unwavering dedication from the company to deliver the best to the consumer. And we all know Hokkaido's magnificent natural environment has always allowed the milk cows to produce one of the finest dairies around the world. Like the Chinese always say, "一分钱,一分货“.

      My take after tasting the Hokkaido Milk? Creamier, slight tone of sweetness and still having that clean finishing taste that doesn't leave that sticky mouth feel. 
      Yup, I do like it very much. And it goes without saying, I was so gonna to bake with this awesome ingredient.

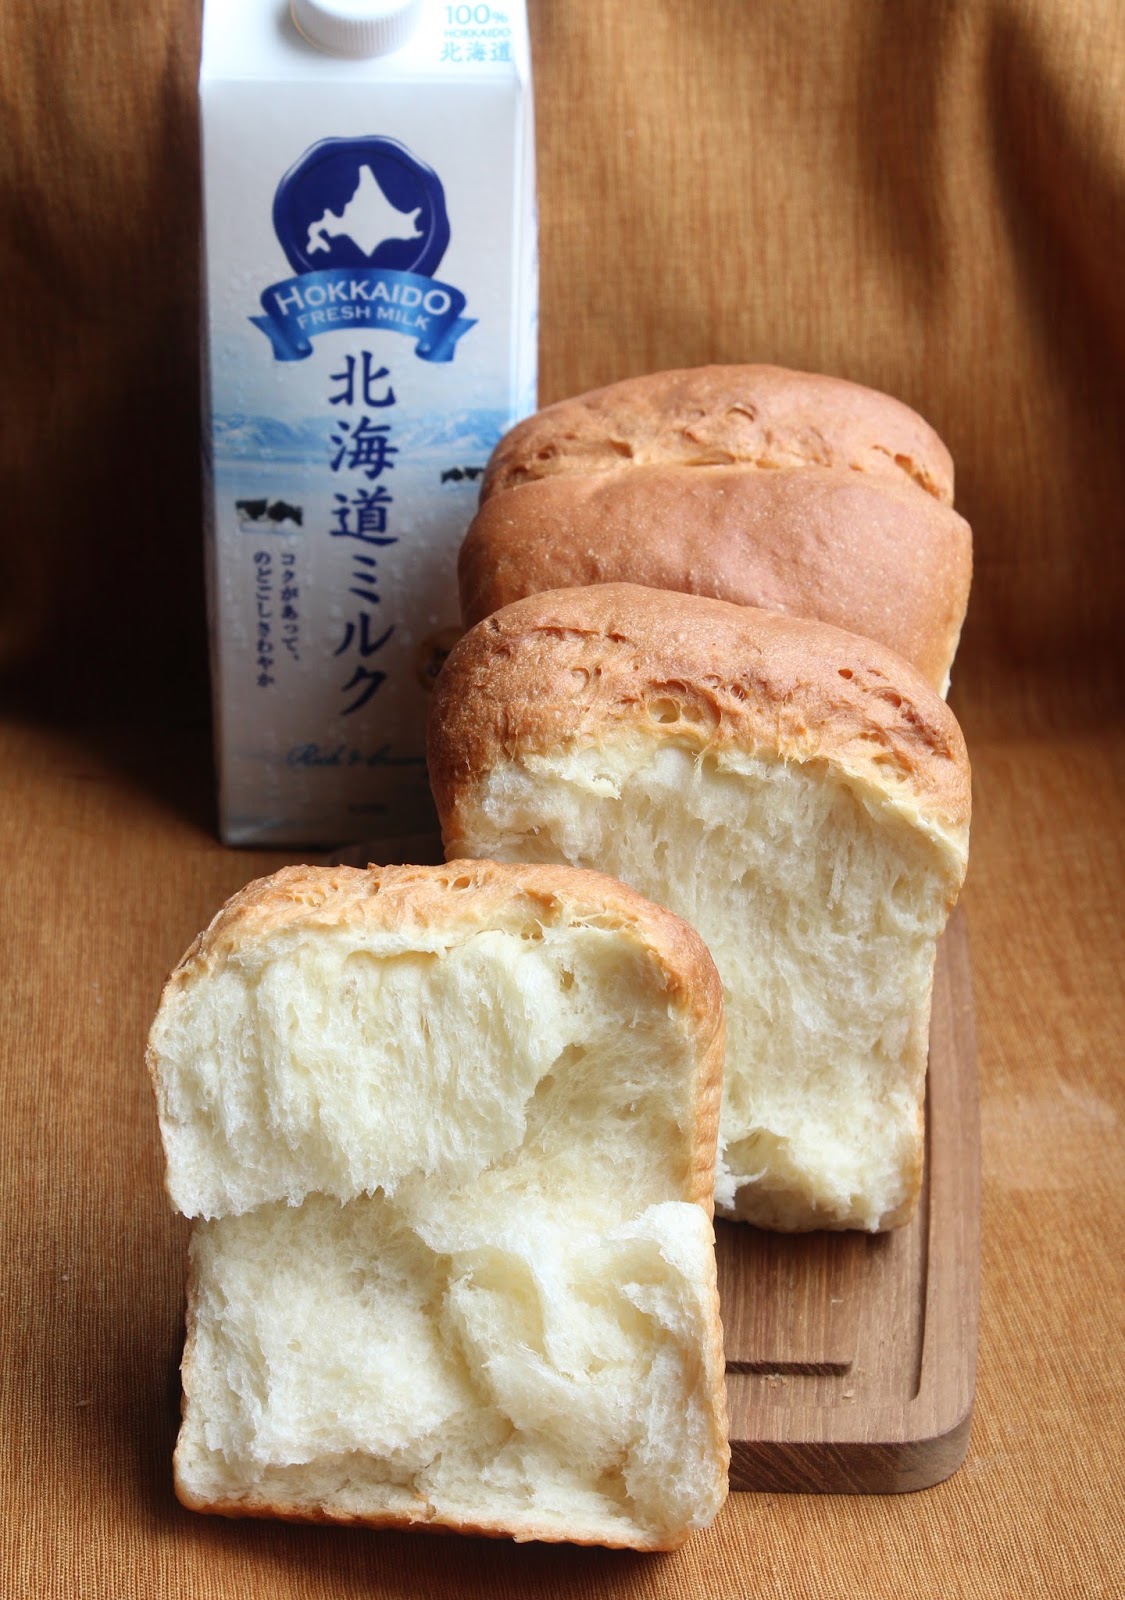
      And so, may I present to you, my very first Hokkaido Milk Loaf using Hokkaido Fresh Milk.

      This was actually my 2nd experimental bake using the Hokkaido milk. The latter was a much more successful one and thus I shall be sharing the recipe with everyone. 

      I was thrilled the emakent I received the fresh milk. Who doesn't? 3 litres of fresh Hokkaido milk right at my doorstep haha!

      Wanted to use the milk when they are still fresh, I got to work immediately to bake that Hokkaido bread loaf. And no, don't even think about it. You cannot substitute this recipe with normal milk. Totally defeats the purpose of baking this Hokkaido Milk Loaf recipe in my opinion. 

      Did some read up online and found that almost all of the Hokkaido bread recipe uses the "TangZhong" (汤种)method. Never really liked the "TangZhong" method because somehow the bread does not stay soft the following day. So I went ahead and came up with a straight  forward, straight dough method. The result was perfect if I dare say so myself. Comparing the 2 attempts, the latter actually yielded a fluffier and tastier bread loaf.


      Ingredients for Hokkaido Milk Loaf (Makes a 9"x5"x4" loaf)

      350 g bread flour
      40 g caster sugar
      5 g instant active yeast
      3 g salt
      210 ml Hokkaido fresh milk from Yotsuba
      30 ml heavy cream
      30 g unsalted butter at room temperature
      • In a large mixing bowl, add in all the ingredients except the butter.
      • Knead it well using the hook attachment, the dough will slowly come together.  
      • Knead everything together at medium low speed. Dough will be sticky at first but continue to knead for 5 minutes and break 3 minutes until the dough pulls away from the side of the mixing bowl.


      • Add in the butter and continue to knead till it is very elastic and reaches the window panel.

      • This is how you can check whether you have reached the window stage, stretch the dough really thin without breaking it and you can literally see through it. 
      • Leave the rolled dough in the greased bowl and let proof for 1.5hr or till it is doubled in size.
      • Once done proofing, stick a finger in and if the dough doesn't "bounce" back, it is ready. 

      • Divide the dough into 4 portions of 150 g. You will be left with about 40-45g of extra dough. You can fill it with Nutella or just wrap it around a hotdog. 
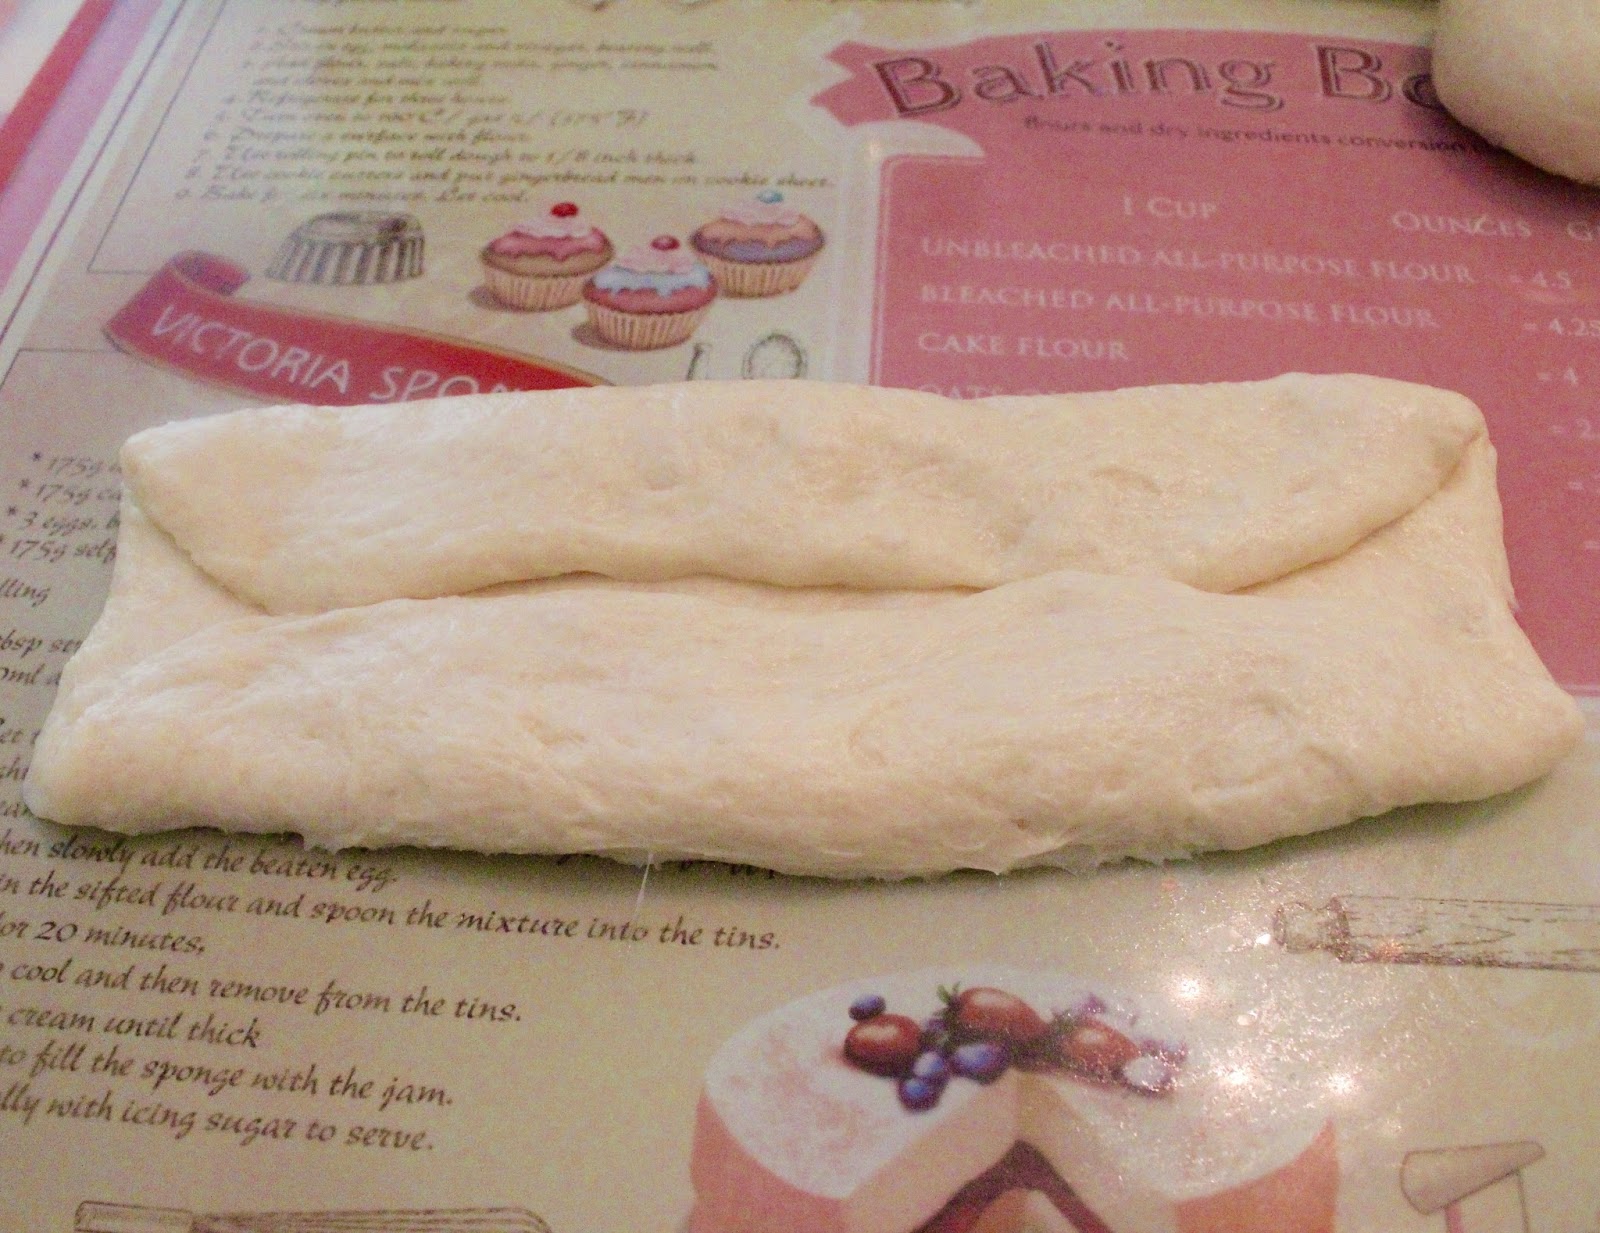
      • For the loaf, take one of the 150 g dough portion and roll it out flat into a square shape. 
      • Then fold in both the left and right side as shown below:
      • Then roll it up from one end (the shorter side) into a swiss roll, then seal up the edge by pinching the dough.

      • Repeat with the remaining 3 portions and place it in a greased loaf tin to proof.

      • Preheat the oven to 175C while waiting for the bread to rise. When ready, bake in the oven for 28-30 minutes till golden brown.


    • Remove from the oven and immediately remove the loaf from the baking tin. Else moisture will build up in the tin and the base of the loaf might get all soggy. Slice the loaf only when it has been completely cooled.

    • Well, I did not exactly slice the loaf this time. Wanted to show the fluffy and fine texture of the bread. And seems like tearing a chunk off does the trick....oops I did it again.


      The picture pretty much speaks for itself. In terms of taste, it is richer and milkier then the other plain milk loafs I have made. Since I did add 3 kinds of dairy into the recipe ( Hokkaido milk, unsalted butter and heavy cream), which really boost that milky rich flavour. And I do believe the Hokkaido milk from Yotsuba's Hokkaido Fresh Milk does makes a difference in this recipe verses using a normal milk. 
      Hope I have not only persuade you enough to try baking this Hokkaido bread, but also to give Yotsuba Hokkaido Fresh milk a try as well. As I strongly believe the quality speaks for itself. This Hokkaido fresh milk will be available in Fair Price Finest or Xtra at 1 Sept and soon in Cold Storage. I love the fact that it is available in NTUC and not in some Japanese grocer. So go grab yourself some! 

      In the meantime, do what you love and stay happy guys


        Add to Cart More Info

        White Loaf Bread

        I think every baker not only should have a good gedang bread recipe, they should very well have a good white bread loaf recipe as well. Bread is such a quintessential part of our daily meals. Whether it is for a quick morning bite, or an afternoon sandwich, it can also be that toasty bread that wipe clean that stew you have for dinner. Some may think of grabbing those less then 2 bucks loaf off the store shelves. You're right, it is easier, I'm guilty of that sometimes...but frankly speaking, the number of times I buy those in a year, I can use my fingers to count. So think again guys, those bread has additives that we can't even pronounce it properly. :P Home baked are always better for sure...well that is if you have the time to do so. Well, at least the recipe I am posting today is a simple straight dough method with ingredients that you can definitely find in your pantry. Life is too complicated to  have too complicated bakes!
        Oops pardon my poor shaping skill to allow that small hole on top. :P But these are the kind of things that happened in the rising process that one is not able to control sometimes. ;P #excuses 
        But overall the loaf turned out beautifully. And I'm stoked that it is a straight  dough method! Less waiting! This recipe calls for egg white, which coincidentally I always have some in my fridge. :P Especially after Chinese new year or some tart baking. The egg white helps enrich the dough. It also retains water content to counteract the drying effect when the bread left out at room temperature.

        Enough chit chat, let's take a look at the ingredients!

        Ingredients for White Bread Loaf
        350 g bread flour
        90 g egg white
        40 g caster sugar
        1/2 tsp salt
        4 g instant active yeast
        155-160 ml fresh milk
        30 g unsalted butter, room temperature
        • In a stand mixer bowl, add in all the ingredients except the butter.
        • Knead it well using the hook attachment, the dough will slowly come together. Continue to knead and eventually it will pulls away from the side of the bowl. That will take about 10-12 minutes. You can stop the kneading for 2 to 3 minutes to have a break in between. 
        • Add in the butter and continue to knead till it is very elastic and reaches the window panel.
        • Leave dough in a greased bowl, covered and let proof till it doubles in size or for 1hr.
        • When it is well proofed, poke in the center. If it doesn't rise back up, the dough is ready to be shaped.
        • Punch out the air and weigh out 4 portions of 150 g of dough. Roll round and cover to rest for 5 minutes before shaping. The remaining dough can be used for other small buns, up to your own creation. ;)

        • Take a portion of the dough and roll it out flat into a rectangle. Roughly the length of 20 cm by 15 cm. Then fold in the longer sides in as shown below.

        • Then roll in from one end like a swiss roll, then seal the edges.

        • Repeat with the rest of the 3 dough portions and then place them into a greased loaf tin.

        • Cover and let rise till it fills 90 percent of the tin. Remember to preheat the oven to 170C. 
        • Then bake in the oven for 28 minutes or till golden brown. Nope, I didn't brush any egg wash.

        • Remove from the loaf tin immediately and let cool completely on the rack before slicing.

        The result? Nice golden brown skin but still thin. Interior is cotton-candy like texture. Very fine composition, soft and fluffy! I couldn't be more happy!
        I couldn't show you enough of the lovely texture. :D And it is home baked! (by you!)

        I always like my old school way of enjoying fresh baked breads....kaya and butter! Yummeh :9 

        Hope you all will give this simple recipe a try. If this is your first time baking a bread, try this out. ;)

        Happy Baking!


        Add to Cart More Info

        Candied Bacon Semolina Buns

        I can't really remember when or where I got this idea of combining candied bacon with bread. Or perhaps its a natural thing to do after all. Sweet and salty, slightly crisp and yet a little chewy with the meaty parts, pairing with those soft buns, seems all too right. Just thinking about it makes my mouth water, haha :P And adding semolina flour into the bread dough is also one of the to-do items in my bake list. I always wonder how it taste like with the addition of semolina in the bread. It turns out pretty subtle. Perhaps I had added too little this time round as the taste wasn't evident at all. But the bread did turn out really soft, so all is not lost! Still a successful bake if I may say so myself. :P

        I suggest buying thin cuts, reduced sodium bacon, for health purpose and also for a better flavoured bun overall. I reckon the original bacon will be too salty and might be a little overwhelming and thick cuts will be harder to crisp up. Do try places like Cold Storage which carries a wider variety of bacon cuts.

        Ingredients for Candied Bacon Semolina Buns (Makes 10-12)

        Pre-fermented dough
        • 250g bread flour
          160ml water
          3g instant dry yeast
          1g salt
          • Knead everything together till it forms a soft pliable dough. No need to be smooth. Divide dough into 50g or100g portions depending on your needs and let chill in fridge up to 12 hours. Alternatively store in freezer up to 3 months.
        100g Pre-fermented dough
        300g bread flour
        50g semolina flour
        1 large eggs (50g without shell)
        150ml water
        20g milk powder
        3g salt
        50g caster sugar
        5g instant active yeast
        30ml olive oil

        8-10 strips thin cuts bacon (preferably reduced sodium kind)
        1/2 cup (125g) light brown sugar
        Anori for deco (dried seaweed flakes) -optional
        • Knead all ingredients of the main dough together. Add pre-ferment dough piece by piece. Knead after each addition until soft and smooth. Knead until stretchable and pass the window panel consistency.
        • Put the dough into a big bowl. Cover with cling wrap and let it prove for 30minutes till double.
        • Divide the dough into 60grams portions. Flatten each portion with your hands to drive the air out. Roll it into square shape, cover with a damp towel and let rest for 20 minutes before shaping.
        • Take one of the dough portions, press out the air then roll out flat into an oval shape. Then from the longer end, roll it up like a swiss roll. Pinch the edges to seal and press it slightly to have flatter surface area to allow the bacon to rest on top. Repeat for all the dough portions. Alternatively, you can just roll them round and also press the surface to flatten it. (yups, I shaped some piggy buns too heehee)

        • While the buns are proofing, preheat the oven to 170C. 
        • Prepare the bacon strips: Place the bacon strips into the bowl of brown sugar and rub it in, coating the bacon with it.

        • Then lay the bacon strips over the proofed buns, careful not to deflate the buns. Notice that I braided some of the bacon. Let your creativity flow!

        • Bake in the preheated oven for 15 minutes till the bacon crisp up and the buns are golden brown.
        • Remove from oven and let cool on the rack. Sprinkle some Anori if desired. Enjoy!


        These buns can be enjoyed the following day by toasting them up either on the pan or under the broiler for a couple of minutes to toast it up well. 

        I have even posted up a "musical"...I mean a short video to show you how soft and fluffy these buns are! Do check it out and experience the fluffiness haha! However you need Flashplayer to view this, so go download it here https://get.adobe.com/flashplayer/ This flash player can only work on desktop though.
        Alternatively, head on over to my instagram account @IG_HoneyBeeSweets to check out this breadporn video. :)

        The sweet and salty, crisp Bacon was such a delight to eat with the soft buns. Really quite the satisfying experience for a bacon and bread lover inside me. :9
        Happiness in a bun....that's what this is. Do give this delicious buns a try and let me know how you like them yes? Oh and before I forget...those piggy buns :P
        Yeah....life's a little more fun if you add more fun into it. ;)

        Have a good day ahead guys!


        Add to Cart More Info